Breaking Dormancy…

09:15am The Lilac in the front yard is breaking dormancy and I think it’s leafing out. I’m not sure if leaves comes out first or flowers… #

7:14pm I started on the my Wooden Orchid Box, but I’m not done yet. You can view my progress here: j.mp/bTipw4 #

11:43pm The White Grape Hyacinths are starting to emerge out of the ground, while the purple ones are already blooming… #

11:48pm Peach ‘Elberta’ in Veggie Bed is starting to flower and leaf out at the same time… Peach ‘Stark Saturn’ grafted onto it is leafing out… #

Filipino Food + Starting Wooden Orchid Box…

1:22pm Filipino Food (@filipinofood) is following me on Twitter… (it sounded funny when I said it out loud)… #

7:14pm I started on the my Wooden Orchid Box, but I’m not done yet. You can view my progress here: j.mp/bTipw4 #

10:05pm Spaghetti with sliced Hot Dogs!!! Yumm#

10:10pm I just heard that Manny Pacquiao will be on Jimmy Kimmel Live… and he’s gonna sing “Nothing’s Gonna Change My Love for You”!!! 12:05am ABC #

My DIY Wooden Orchid Box…

I was inspired to make my own Wooden Orchid Box, so I used Cultivating Life’s Cedar Orchid Box as inspiration.

Yesterday, I borrowed my boss’ Dremel drill.

Look what my boss let me borrow...

I collected the tools and materials I needed to create my DIY Wooden Orchid Box.

DIY Wooden Orchid Box (Tools and Materials)

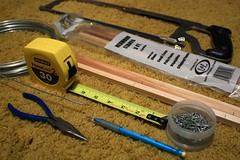
– Redwood Stakes (these were 3ft. stakes)
– Saw
– Tape measure
– Small nails
– Pencil/Marker
– Long-nosed pliers
– Galvantized wire
– Dremel (with drill bit)
– Scrap wood (to drill through)

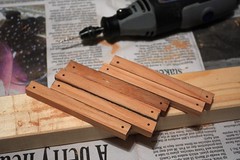
1. I first cut the Redwood Stakes into 3 inch strips.

2. I then took one of the strips and drilled a hole on each side. Using this as a template, I drilled the other strips. The lengths of the strips can vary a bit, but since the holes have to line up, it’s important to use the first drilled strip as a template.

DIY Wooden Orchid Box (Step 1-2)

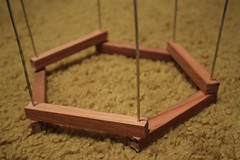
3. I then cut some galvantized metal wire, straightened it and made a hook on one side.

DIY Wooden Orchid Box (Step 3)

4. Slide the wire through the holes on the strips.

I was originally going to make a square, but then decided I wanted something rounder, but I didn’t want to make an octagon… so I made a hexagon shape.

DIY Wooden Orchid Box (Step 4)

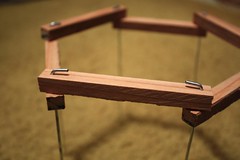
This is how the hook looked under the strips. I think I will modify this and bend the wire end more to create a loop.

DIY Wooden Orchid Box (Bottom Hook)

5. Keep adding strip in an alternating pattern (see photo below).

I’m still figuring out if I like this shape or if I want to revert back to a square shape. If I stick with a hexagon shape, I need to figure out how to make the bottom… I’ll do that later.

DIY Wooden Orchid Box (Step 5)

…to be continued…

Paper Bags or Plastic Bags?…

I found this article interesting. I really need to remember to bring my reusable bags to the grocery…

Paper Bags or Plastic Bags? Everything You Need to Know (on Greenhouse Neutral Foundation website)

MacJournal

I’ve been manually transferring my journal entries from my old blog to this one, but haven’t quite completed the process.

As, I was trying out an app called MacJournal, I discovered a slightly easier way to transfer entries from one blog to another than using a web browser (which was hoe I was doing it). I still have to do each entry manually, but I don’t have to copy/paste/enter entry dates/etc.

Here’s how I did it:

1. First, I created a New Journal for old blog. I’ll name this “Old Journal”… I then connect the old blog to “Old Journal” by selecting Journal > Edit Blog Setting… (Follow the steps to add the blog)

2. I then created another journal for my current blog (the one you’re reading) following the same steps as above.

3. I then downloaded all the blog entries to MacJournal using Journal > Download Entries from Blog… Now I can see all my entries from my old blog.

4. I selected an entry from my old blog, right-click it, then select Share > Send to other blog…

[Update]

So, as I was transferring my entries from my old blog to this one, I noticed that some of the formatting got messed up when the entries were downloaded from the old blog to MacJournal. Also, I can’t figure out how to look at the HTML code directly; I can only see it WYSIWYG… so I was also losing the LJ-cuts… so I think I will stick to manually transferring using a web browser for now… It’ll just take longer, but I’ll just do it in batches…