DIY Reusable Produce Bags…

We have been using reusable grocery bags for a couple years now and have reduced the number of plastic bags that we get… but I wanted to get more since we either use them up (we just have five of them) or forget them at home (I can keep more in the car). I bought some zTotes which are like the ones we have now.

While searching, I noticed reuseable produce bags, which made me think… We should use those too, so I searched for some to buy, but then realized that maybe I can make some with those mesh bags that we get with ginger, onion and little potatoes.

So I made these.

Homemade Produce Bags

Homemade Produce Bags

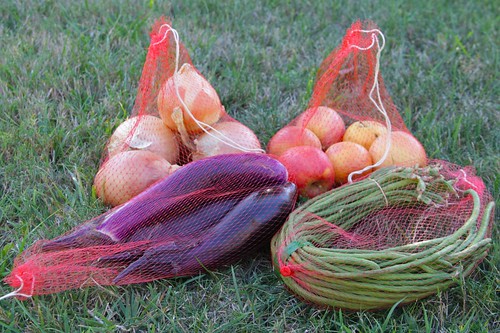
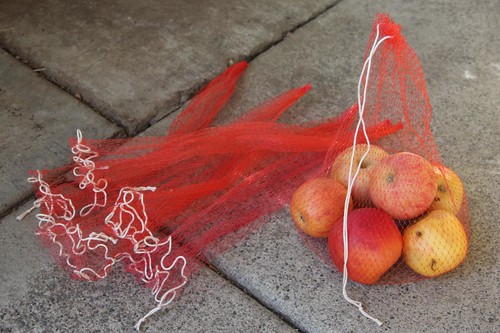
It was pretty easy since the bottom was already made. I just turned the top edge and weaved a string in and out to form a draw string to close the bag once filled.

Homemade Produce Bags

I tested it and it worked well for most produce, but greens and Broccoli kinda got a little damaged, so I purchased some reuseable produce bags by Flip & Tumble for these.

Hopefully, we’ll have much less plastics coming into the house, including plastic produce bags.

PVC DIY Projects…

Yesterday, Me and my Mom went to Home Depot to get some narrow cement hollow blocks to make a narrow garden bed along our north fence. Something my Mom has been asking me to build/fix.

I also decided to get some PVC pipes and connectors to build a cold frame that I want to put over Veggie Bed #2 to protect a Pomelo tree and extend my Peppers growing season, since it’s starting to get cold. I quickly drew a sketch for the cold frame and figured out what supplies I needed.

As I was gathering the PVC pipes and connectors, I had another idea to make dividers for my SFG (Square Foot Garden). So I got more connectors and pipes and somehow got all of these to fit in my Honda Civic Coupe… Note that those PVC pipes were 10 foot tall!

Once home, I started to assemble the cold frame, but it started too look like my plan wasn’t going to work, since I couldn’t bend the pipes as much as I could. So I sketched another plan and decided to leave this project for tomorrow when I can get more connectors and pipes.

Mini-Greenhouse/Cold Frame Plan

So I put my cold frame plans aside and built out the SFG dividers. I figure out to cut the pipes into 10.25 inch length. When I add the connectors to it, it comes out to about 12 inches center to center, which is the right size.

This morning I cleared out Veggie Bed #1 and placed the SFG dividers. Here’s how it looked like:

SFG with PVC Dividers

Not bad. I was really happy with it. This will definitely last longer than my other failed attempts using nylon rope (which disintegrated after a season), dowels (which warped and just got old) and wire (which was hard to see).

MacBook Hard Drive Replacement…

I have a spare 500GB SATA hard drive that I’m not using, so I decided to replace the 250GB internal hard drive. I bought the 500GB hard drive a while back to try to fix my old Mac mini, but I never got it to work again, so I gave up.

For reference, I’m using the article “Simple Hard Drive Cloning/Backup with Carbon Copy Cloner” for step by step directions:

First step was to get a 2.5″ Hard Drive Enclosure so I can clone my existing MacBook internal hard drive to the new one. I got a cheap Vantec NexStar TX 2.5-Inch SATA to USB 2.0 External Hard Drive Enclosure from Amazon for under $10. Once I got this in the mail. I installed the new 500GB drive into it, plugged it into my MacBook and formatted it.

Cloning Todipoli Hard Drive

Next, I download the Carbon Copy Cloner app to clone my existing drive onto the new one.

After more than 3 hours of copying files over, I shut down the MacBook, opened the back panel and unscrewed the internal hard drive. I then swtiched it with the new drive… powered it on… and it booted up with everything pretty much the same. The only big difference was that I have way more hard drive space.

Available Space

Now, I’ll keep the original hard drive (in the USB hard drive enclosure) for a couple months, just in case something goes wrong with the new drive.

Making Winter Sowing Containers…

I realized that I posted some information about winter sowing in previous entries:
http://www.joeysplanting.com/2010/02/04/winter-sowing/
http://www.joeysplanting.com/2010/02/03/milk-carton-gathering/

…but never posted instructions on how I did them… so here I go:

Making Winter Sowing Containers (Step 1)

I first marked where I wanted to cut the bottles and milk cartons using a Sharpie permanent marker…

To make this easier for me, I cut a strip of cardboard 2.5 inches tall, aligned the cardboard and bottle on the ground, then traced along the top edge of the cardboard with the Sharpie onto the bottle…

then I carefully cut along the line.

Making Winter Sowing Containers (Step 2)

I then poked holes in the bottoms to let excess water flow through the container.

A friend on Flickr suggested that I also put additional hole on the sides to allow better drainage, especially if these sit on a flat surface .

Making Winter Sowing Containers (Step 3)

I created vent holes on my first container, but later ommitted this step and just left the top off the bottle.

Making Winter Sowing Containers (Step 4)

Added some potting soil to about 2 inches and sowed some seeds. For my first two winter sowing container, I planted Daisy Garden Wildflower Mix and a Wildflower Mix I got free from Subaru (at the SF Flower and Garden Show).

Winter Sown Seeds

For my second batch, I sowed: Zinnia ‘Whirligig’ Cosmos ‘Bright Lights Mix’ Alyssum ‘Gold Dust’ Melampodium (Butter Daisy), Cilantro Zinnia (Fall 2005).

Winter Sown

Here they are all lined up in our backyard.

My DIY Wooden Orchid Box…

I was inspired to make my own Wooden Orchid Box, so I used Cultivating Life’s Cedar Orchid Box as inspiration.

Yesterday, I borrowed my boss’ Dremel drill.

Look what my boss let me borrow...

I collected the tools and materials I needed to create my DIY Wooden Orchid Box.

DIY Wooden Orchid Box (Tools and Materials)

– Redwood Stakes (these were 3ft. stakes)
– Saw
– Tape measure
– Small nails
– Pencil/Marker
– Long-nosed pliers
– Galvantized wire
– Dremel (with drill bit)
– Scrap wood (to drill through)

1. I first cut the Redwood Stakes into 3 inch strips.

2. I then took one of the strips and drilled a hole on each side. Using this as a template, I drilled the other strips. The lengths of the strips can vary a bit, but since the holes have to line up, it’s important to use the first drilled strip as a template.

DIY Wooden Orchid Box (Step 1-2)

3. I then cut some galvantized metal wire, straightened it and made a hook on one side.

DIY Wooden Orchid Box (Step 3)

4. Slide the wire through the holes on the strips.

I was originally going to make a square, but then decided I wanted something rounder, but I didn’t want to make an octagon… so I made a hexagon shape.

DIY Wooden Orchid Box (Step 4)

This is how the hook looked under the strips. I think I will modify this and bend the wire end more to create a loop.

DIY Wooden Orchid Box (Bottom Hook)

5. Keep adding strip in an alternating pattern (see photo below).

I’m still figuring out if I like this shape or if I want to revert back to a square shape. If I stick with a hexagon shape, I need to figure out how to make the bottom… I’ll do that later.

DIY Wooden Orchid Box (Step 5)

…to be continued…